概要
注意事項
- Pandoc2.1.1、reveal.js(2018年2月6日版)による、2018年2月版の記事をアップしたので、こちらは古い情報になります。
- Pandocのバージョンによってはうまく動作しない場合があります。下記の記事は Pandoc 1.19.1 で動作確認しています。
コマンド一発で、markdownからreveal.jsの「htmlスライド」と、そのスライドから配布資料用の「レジュメ」のpdfを生成する方法。
pandocで、markdownからreveal.jsのスライド作成は、まあ、普通。
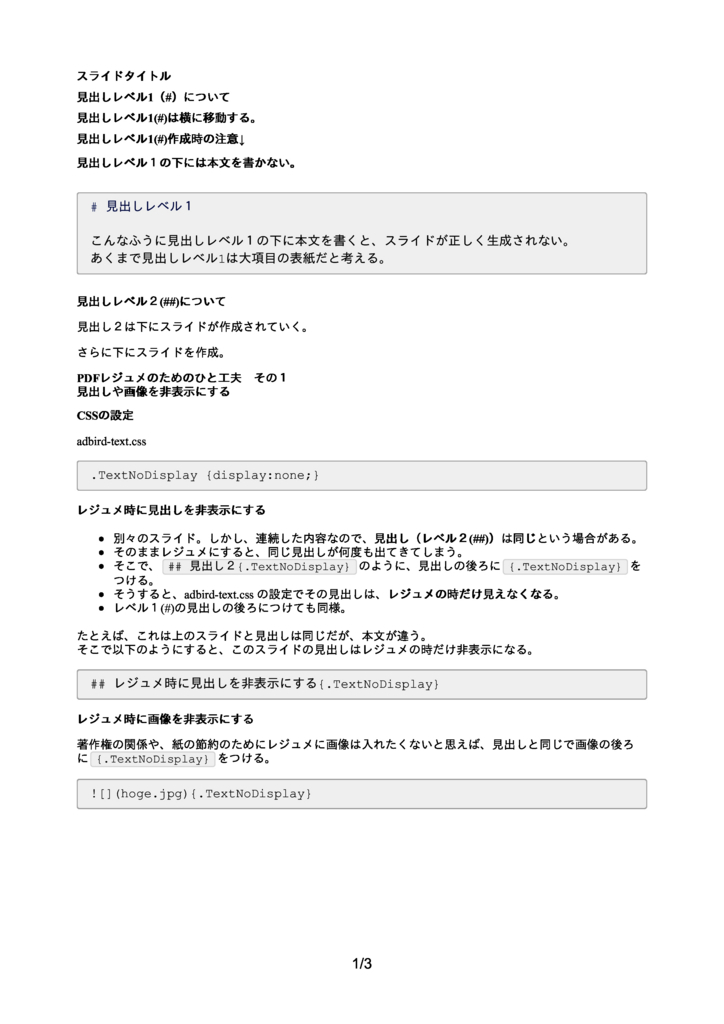
特徴的なのは、レジュメの方。
markdown →(pandoc)→ html + css →(wkhtmltopdf)→ pdf という流れ。
一般的にスライドを配布資料として印刷しようとすると、1枚の用紙にスライドを縮小させたのを4〜6枚程度並べたものになるだろう。しかし、それだと余白がもったいないし、余白がもったいないからと言ってさらにたくさんのスライドを並べたら、文字が小さくなって読みづらい。
そこで配布資料の方は、文書作成ソフトで作ったような、いわゆる「レジュメ」形式なるように生成できるようにした。
フォルダ内の構成
任意のフォルダ
┃
┣ reveal.jsフォルダ
┃ (reveal.js-master.zipを解凍してできたフォルダをreveal.jsにリネーム)
┣ adbird.css (スライドに適用させるCSS)
┣ adbird-text.css (レジュメに適用させるCSS)
┣ makeslide.sh (Linuxのみ。スクリプトファイル)
┣ makeslide.bat (Windowsのみ。スクリプトファイル)
┣ スライド.md (スライド・レジュメ原稿ファイル)
下準備 インストール・ダウンロード編
- Pandocをインストール
- 「There is a package installer at pandoc’s download page.」のリンク先の下の方にあるインストーラーをダウンロードして、インストール。
- reveal.jsをダウンロード
- 「Clone or Download」をクリックして、zipをダウンロード。
- zipを解凍、フォルダをreveal.jsにリネームして、上記のように、原稿のマークダウンファイルなどと同じ任意のフォルダ内に置く。
- wkhtmltopdfをインストール
Windowsの場合、パスを通す必要があるかも。
下準備 設定ファイル編
adbird.css
スライドに適用させるcss。
まあ、適当にいじってくださいw。
/*フォント大きさ*/
div.xxs {font-size: 13pt; }
div.xs {font-size: 15pt; }
div.s {font-size: 20pt; }
div.m{font-size: 25pt; }
div.l{font-size:large}
div.xl{font-size:x-large}
div.xxl{font-size:xx-large}
div.smaller { font-size: smaller }
div.footnote { font-size: smaller; margin-left: 2em; }
div.center { text-align: center }

.reveal h1{font-size:40pt;}
/* .reveal h1{font-size:35pt;} */
section h1.title{font-size:50pt;}
section h2.author{font-size:25pt;}
section h3.date{font-size:25pt;}
.reveal h2{font-size:38pt;}
section.xxs {font-size: 13pt; }
section.xs {font-size: 15pt; }
section.s {font-size: 20pt; }
section.m{font-size: 25pt; }
section.l{font-size:large}
section.xl{font-size:x-large}
section.xxl{font-size:xx-large}
section.smaller { font-size: smaller }
section.footnote { font-size: smaller; margin-left: 2em; }
section.center { text-align: center }

span.xxs {font-size: 13pt; }
span.xs {font-size: 15pt; }
span.s {font-size: 20pt; }
span.m{font-size: 25pt; }
span.l{font-size:large}
span.xl{font-size:x-large}
span.xxl{font-size:xx-large}
span.smaller { font-size: smaller }
span.footnote { font-size: smaller; margin-left: 2em; }
span.center { text-align: center }

.reveal table {font-size: 25pt; }

/*強調*/
em {
    color:#FF9900;
    font-weight:bold;
    font-style:normal;
}

div.build{
margin:10pt;
}

/*定義リスト*/
dt {
    color:red;
    font-weight:bold;
    font-style:normal;
}

dd{
    line-height:1.3;
}

/*下線 取り消し線*/
.underline {
    border-bottom:solid 2px black;
}

.overline {text-decoration:overline}
.cancel {text-decoration:line-through}

/* スライド全体のテキスト位置 */
section {text-align: left;}

/* テキスト右寄せ */
.textright { text-align: right; }

/* テキスト左寄せ */
.textleft { text-align: left; }

/*画像センタリング*/
img.center{
    display:block;
    margin:0 auto 100 auto;
}

/*画像回りこみ解除*/
.newpara { clear:left }

/*ブロック・画像回り込み*/
div.floatleft{
    float: left;
}

div.floatright{
    float: right;
}

img.floatleft{
    float: left;
}

img.floatright{
    float: right;
}

/*画像キャプション*/
.imgcap{
    font-size:xx-small;
    margin:0;
    padding:0;
    line-height:1em;
}

/*コード*/
.reveal code{
  margin: 2px 2px;
  padding: 0 5px;
  white-space: nowrap;
  border: 1px solid #eaeaea;
  background-color: #6E6E6E;
  border-radius: 3px;
  font-size: 24pt; }

.reveal pre {
  background-color: #6E6E6E;
  border: 1px solid #cccccc;
  font-size: 24pt;
  line-height: ;
  overflow: auto;
  padding: 0;
  border-radius: 3px; }

.reveal  pre code {
  white-space: pre;
  background-color: transparent;
  border: none; }

/*引用*/
.reveal blockquote {
    text-align: left;
    font-size: 25pt;
width:25em;
    }

/*スライド時の非表示*/
.SlideNoDisplay {display:none;}
adbird-text.css
レジュメに適用させるcss
これも適当にいじってくださいw。
/*フォント大きさ*/
.xxs {font-size: 7pt; }
.xs {font-size: 8pt; }
.s {font-size: 9pt; }
.m{font-size: 9pt; }
.l{font-size:large}
.xl{font-size:x-large}
.xxl{font-size:xx-large}
.smaller { font-size: smaller }
.footnote { font-size: smaller; margin-left: 2em; }
.center { text-align: center }

.reveal h1{font-size:50pt;}

h1{font-size:10pt}
h2{font-size:10pt}
h3{font-size:10pt}
p{font-size:10pt}

.date{font-size:10pt}

/*強調*/
em {
    color:black;
    font-weight:bold;
    font-style:normal;
}

div.build{
margin:10pt;
}

/*リスト*/

li{font-size:10pt}

/* 表 */

th{ font-size:10pt;
}

td{ font-size:10pt;
}

/*定義リスト*/
dt {
    color:black;
    font-weight:bold;
    font-style:normal;
    font-size:10pt;
}

dd{
    line-height:1.3;
    font-size:10pt;
}

/*下線 取り消し線*/
.underline {
    border-bottom:solid 2px black;
}

.overline {text-decoration:overline}
.cancel {text-decoration:line-through}

/* テキスト右寄せ */
.textright { text-align: right; }

img.big{
max-width: 500px;
  max-height: 500px;
}

/*画像一括サイズリサイズ*/
img{
max-width: 230px;
  max-height: 230px;
}

/*画像センタリング*/
img.center{
    display:block;
    margin:0 auto 0 auto;
}

/*画像回りこみ解除*/
.newpara { clear:left }

/*ブロック・画像回り込み*/
div.floatleft{
    float: left;
}

div.floatright{
    float: right;
}

img.floatleft{
    float: left;
}

img.floatright{
    float: right;
}

/*画像キャプション*/
.imgcap{
    font-size:xx-small;
    margin:0;
    padding:0;
    line-height:1em;
}

/*引用*/
blockquote{font-size: 10pt;}

/*コード*/
code, tt {
  margin: 0 2px;
  padding: 0 5px;
  white-space: nowrap;
  border: 1px solid #eaeaea;
  background-color: #f8f8f8;
  border-radius: 3px; }

pre code {
  margin: 0;
  padding: 0;
  white-space: pre;
  border: none;
  background: transparent;
  text-indent: 0em;
}

.highlight pre {
  background-color: #f8f8f8;
  border: 1px solid #cccccc;
  font-size: 14px;
  line-height: 19px;
  overflow: auto;
  padding: 6px 10px;
  border-radius: 3px; }

pre {
  background-color: #f8f8f8;
  border: 1px solid #cccccc;
  font-size: 14px;
  line-height: 19px;
  overflow: auto;
  padding: 6px 14px;
  border-radius: 3px; }
  pre code, pre tt {
    background-color: transparent;
    border: none; }

/*レジュメ時の非表示*/
.TextNoDisplay {display:none;}
.author {display:none;}
.date {display:none;}


/*改ページ*/
.pagebreak{
    page-break-before:always;
    padding-top:0em;
    text-align: justify;
    text-justify: inter-ideograph;
}
makeslide.sh
- pandocで、スライド・レジュメ原稿のマークダウンファイルを、reveal.js用のhtmlスライドに変換。
- pandocで、スライド・レジュメ原稿のマークダウンファイルを、レジュメ用のhtmlファイルに変換。
- wkhtmltopdfで、レジュメ用のhtmlファイルを、レジュメpdfファイルに変換。
- レジュメ用のhtmlファイルを削除。
#!/bin/sh

pandoc -c adbird.css  -s -t revealjs -o $1.html $1.md
pandoc -c adbird-text.css  -s -t html -o $1_レジュメ.html $1.md
wkhtmltopdf --disable-smart-shrinking --margin-top 20 --margin-left 20 --margin-right 20 --margin-bottom 20 --footer-center '[page]/[topage]' $1_レジュメ.html $1_レジュメ.pdf
rm -f $1_レジュメ.html
makeslide.bat
pandoc -c adbird.css -s -t revealjs -o %~n1.html %~n1.md
pandoc -c adbird-text.css -s -t html -o %~n1text.html %~n1.md
wkhtmltopdf --disable-smart-shrinking --margin-top 20 --margin-left 20 --margin-right 20 --margin-bottom 20 --footer-center '[page]/[topage]' %~n1text.html %~n1text.pdf
del %~n1text.html
スライド・レジュメ原稿を作成する(スライド.md)
% スライドタイトル
% 作成者
% 日付等
# 見出しレベル1(#)について
# 見出しレベル1(#)は横に移動する。
# 見出しレベル1(#)作成時の注意↓
## 見出しレベル1の下には本文を書かない。
```markdown
# 見出しレベル1
こんなふうに見出しレベル1の下に本文を書くと、スライドが正しく生成されない。
あくまで見出しレベル1は大項目の表紙だと考える。
```
# 見出しレベル2(##)について
## 見出しレベル2(##){.TextNoDisplay}
見出し2は下にスライドが作成されていく。
## 見出しレベル2(##){.TextNoDisplay}
さらに下にスライドを作成。
# PDFレジュメのためのひと工夫 その1<br />見出しや画像を非表示にする
## CSSの設定
adbird-text.css
```
.TextNoDisplay {display:none;}
```
## レジュメ時に見出しを非表示にする
- 別々のスライド。しかし、連続した内容なので、*見出し(レベル2(##))*は*同じ*という場合がある。
- そのままレジュメにすると、同じ見出しが何度も出てきてしまう。
- そこで、`## 見出し2{.TextNoDisplay}`のように、見出しの後ろに`{.TextNoDisplay}`をつける。
- そうすると、adbird-text.css の設定でその見出しは、*レジュメの時だけ見えなくなる*。
- レベル1(#)の見出しの後ろにつけても同様。
## レジュメ時に見出しを非表示にする{.TextNoDisplay}
たとえば、これは上のスライドと見出しは同じだが、本文が違う。
そこで以下のようにすると、このスライドの見出しはレジュメの時だけ非表示になる。
```
## レジュメ時に見出しを非表示にする{.TextNoDisplay}
```
## レジュメ時に画像を非表示にする
著作権の関係や、紙の節約のためにレジュメに画像は入れたくないと思えば、見出しと同じで画像の後ろに`{.TextNoDisplay}`をつける。
```
{.TextNoDisplay}
```
## スライド1枚丸々を非表示にする{.pagebreak}
スライド1面丸々、レジュメにだけ表示したくない場合は、見出しの後ろに`{.TextNoDisplay}`をつけて、さらに本文もタグで囲めばよい。
```
## 見出し{.TextNoDisplay}
<div class="TextNoDisplay">
スライドの本文
</div>
```
## スライド1枚丸々を非表示にする{.TextNoDisplay}
<div class="TextNoDisplay">
たとえば、このスライドはレジュメのときには表示されない。
</div>
## スライド時に非表示
逆にレジュメには表示されるけれど、スライドのときには表示されないというのもできる。
adbird.css の設定。
`.SlideNoDisplay {display:none;}`
たとえば、
```
この→<span class="SlideNoDisplay">文字</span>←はスライドでは非表示。
```
この→<span class="SlideNoDisplay">文字</span>←はスライドでは非表示。
# PDFレジュメのためのひと工夫 その2<br />任意の場所で改ページ
## CSSの設定
adbird-text.css
```
.pagebreak{
page-break-before:always;
padding-top:0em;
text-align: justify;
text-justify: inter-ideograph;
}
```
## レジュメ時の改ページ
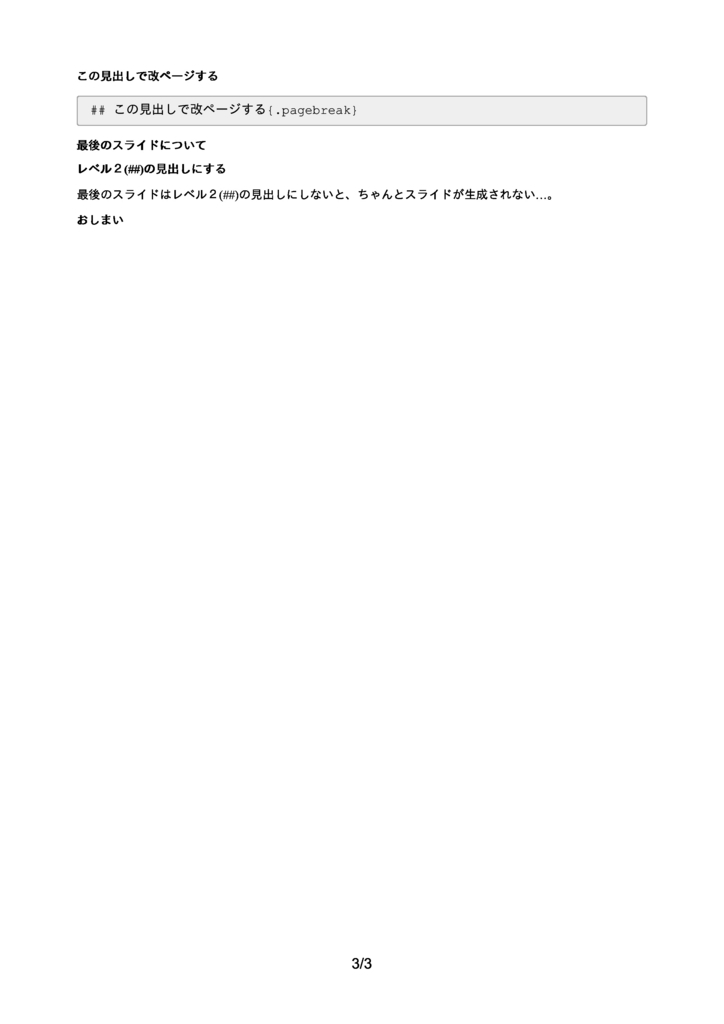
レジュメ時に、ある見出しのところで改ページを入れたいときは、見出しの後ろに`{.pagebreak}`を入れる。
## この見出しで改ページする{.pagebreak}
```
## この見出しで改ページする{.pagebreak}
```
# 最後のスライドについて
## レベル2(##)の見出しにする
最後のスライドはレベル2(##)の見出しにしないと、ちゃんとスライドが生成されない…。
## おしまい
<!-- 独自記法メモ
レジュメ時に表示しないようにするには、{.TextNoDisplay}
改ページつきの見出しには、{.pagebreak}
-->
コマンド実行
$ sh makeslide.sh スライド
Windows(エクスプローラーからのコマンドプロンプト起動)
$ makeslide.bat スライド
フォルダ内に、「スライド.html」と「スライド_レジュメ.pdf(Windowsではスライドtext.pdf)」ができているはず。
「スライド.html」をブラウザで開けば、スライドが表示されるはず。
「スライド_レジュメ.pdf(Windowsではスライドtext.pdf)」を開けば、以下のようなレジュメができているはず。
レジュメのサンプル画像


